19 Techniques to Optimize Your Website’s Speed and Accelerate Its Loading Time

Have you ever abandoned a website just because it was too slow to load?
My guess would be a big fat, yes.
So, in this article, I am going to give the rundown of the most crucial to-dos to optimize your website’s loading speed better and ultimately, speed it up.
Online users have a very short attention span, and if you want to get their notice, you have to be fast above everything else. Even a teeny tiny delay of 1 or 2 seconds can affect the sales of your website largely.
Don’t believe me? Well, here are the facts.
According to Hubspot, a 1-second delay equals a 7 percent reduction in sales conversions. So, a page slowdown of 1 second would cost Amazon $1.6 billion in sales each year.
In another instance, Firefox download figures rose to 10 million per year when Mozilla increased page speed by 2.2 seconds.
So, you can tell that when it comes to user satisfaction, better site load speed is always the way to go.
Even if your website contains the holy grail of products or services, your online business won’t be a success if your site loads slow.
Plus, a slow and sluggish website reflects poorly on the image and reputation of your brand. Google won’t rank your website if your bounce rate is too high. So, all your other SEO efforts won’t be worth much if you can’t speed up your website.
The loading speed of a website is crucial to retain consumers’ attention and engagement. If your site is not fast enough, then you will lose a sales opportunity to the sea of competitors available online.
A website can gain true credibility and recognition from users if along with your content; the user experience is top-notch too.
So, the matter boils down to one problem: delays can kill your online business. The solution to this being: increase website speed to boost user satisfaction and SEO.
That being said, what you would do if you want to increase the loading speed of your website.
There are many ways in which you can optimize your site’s loading time, and achieve the desirable website loading speed to retain customers better and stay in Google’s good graces.
19 Techniques to Optimize Your Website’s Speed and Loading Time
- Enable GZip compression
- Apply browser caching
- Optimize images
- Minify CSS
- Enable JavaScript minification
- Optimize JavaScript placement
- Use CSS image sprite
- Consolidate CSS & JS external files
- Keep the number of plugins low
- Reduce the HTTP calls
- Leverage CDN technology
- Reduce the URL redirection chains and loops
- Embed videos
- Update the software, plugins, and tools
- Keep your website’s database optimized
- Optimize the HTML
- Reduce server response times (TTFB)
- Remove render-blocking resources and unused CSS
- Make the default text visible during webfont load
3 Best Tools to Monitor Your Website’s Speed and Loading Time
So, without any further ado, let’s head straight to the site’s speed optimization techniques.
1. Enable GZip Compression
The biggest reason behind a slow website is bulky data that takes too much time to load.
If you want a site that is fast and responsive, you would have to reduce the size of the data being handled by the web server and the browser, so that the users get access to it within a few seconds.
We are all familiar with the compression of data to reduce their size. We do it all the time on our computers to conserve space.
In a website’s case, a similar concept of compression also applies.
The data that a web browser fetches from the web server and database before rendering it to the browser, if compressed and reduced in size would take considerably less time to load. Data retrieval will be fast, and website speed will go up significantly.
GZip is a file format and an application that is used for file compression and decompression process. It compresses the data packets handled by the web server and browser by reducing the size of the HTML, cascading style sheets (CSS), JavaScript files, etc.
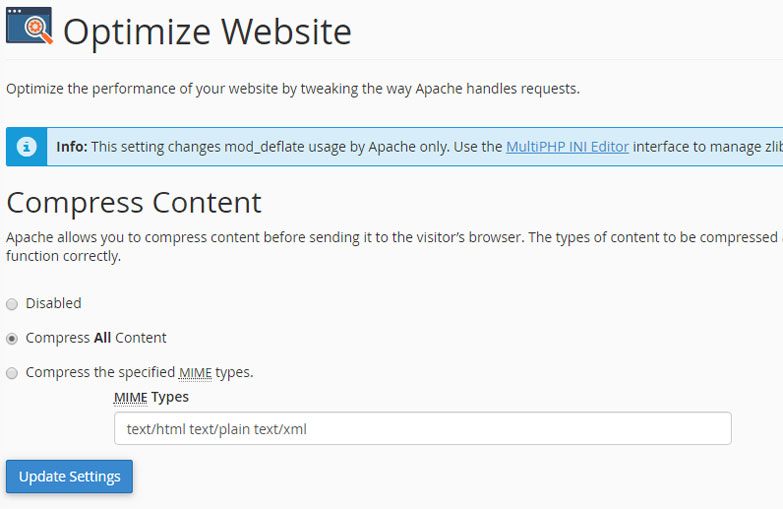
To use this compression technique, you have to go to the cPanel of your website and select the “Compress all content” option and you are done.
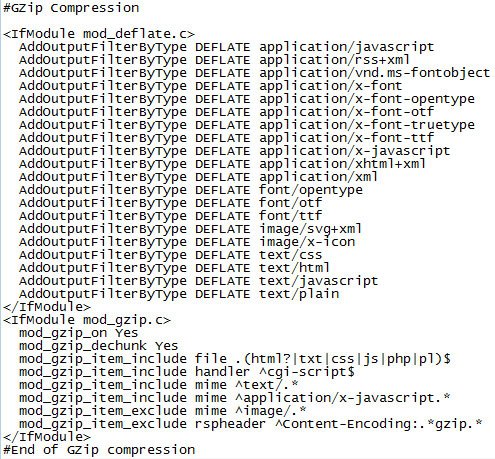
If you do not have access to the cPanel, you can apply compression by copy, pasting the following code to the Htaccess file on your web host/server.
If you have a WordPress website and are using the Yoast SEO plugin, then from the Yoast settings part, you can visit the “Tools” section. Next, click the “File editor”, and access the Htaccess file.
GZip compression does not compromise on the quality of the images or the videos that you have hosted on your website. It is a great speed optimization tool that can reduce the size of the data packets up to 70 percent.
The entire process of compression depends on the browser that is rendering the data. If the browser understands compressed data from the web-server, then the GZip compression works seamlessly and eventually speeds up the website.
But if the browser cannot display compressed data, then GZip compression does not work. When this mostly happens for the old browsers, all modern browsers can understand compressed data, so this is mostly not a big issue.
Compressing data is now a norm for all websites. To find out whether GZip compression is being used on your website, all you have to do is open the source code and look for the response header “content-encoding: gzip”. If it exists, then you have GZip compression enabled for the site.
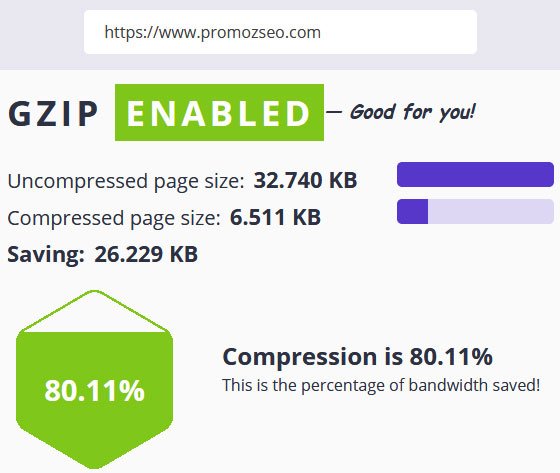
Another way to check if the GZip compression has been applied to your website is through the free GZip compression tools.
Just copy your website’s URL, paste it on any of the online GZip compression checkers and search. If your site has compression, the result will come back as the amount of space saved due to the compression. If not, it will return as “not enabled”.
So, the process of enabling GZip compression for your website is not very complicated, and you can easily apply it to speed up your website.
Compressed data helps you save on bandwidth and reduce download time. And we know that smaller files equal fast download which ultimately results in a happy user.
2. Apply Browser Caching
When a user clicks on a link, the browser creates a request. Then the request is handed off to the web-server to look for it from the files and databases.
A web server can take its own sweet time to come back with the data as the response. It depends on the size of the file requested, server processing time, etc. This delay (the time between the request and response) is called the server latency time.
To reduce this inevitable delay, browser caching is used.
Browser cache stores the static content of the website when a user visits it for the first time. So, next time when the user revisits the website using the same browser and system, the browser does not have to wait for the server and loads the static part of the site from its cache. This saves time significantly, as it reduces the server latency time.
Browser caching is fast and efficient. It helps in speeding up the loading time of a website considerably. But this only works when the user visits the site using the same browser on the same device as before.
Browser cache is used to store the static elements like HTML, CSS, JavaScripts, images, hosted-videos, etc., which don’t need to be downloaded every time from the server. And thus, it increases the website’s loading speed.
The types of files, browsers can store are:
- Image files
- Static resources – CSS Files, JavaScript files
- Object data – PDF files, multimedia contents
As said earlier, the static data in the cache do not need to be reloaded from the server every time a visitor visits the website. If the cache is deleted or expired then the stored data will be gone. Besides, if the page is updated, then the older cached data will be flushed out. The new static content then will again be stored in the cache when the user visits the website next time.
There are many useful plugins available for enabling browser caching for WordPress websites. The most significant ones are W3 Total Cache, WP Super Cache, and WP Fastest Cache.
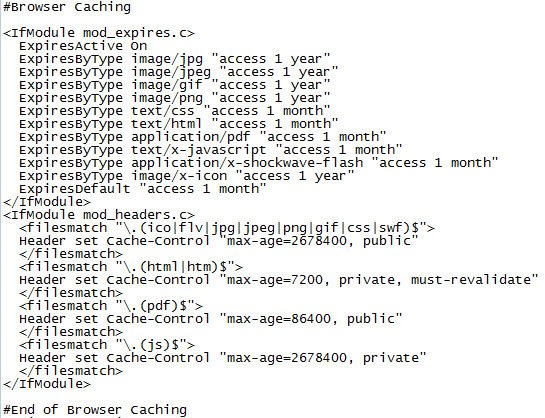
If you are not using a WordPress website, then you can employ browser caching by simply adding this following piece of code on your site’s Htaccess file.
Make sure to point a relatively long expiry time for elements that do not change frequently and for elements that need periodical updates, mention short expiry time.
Besides browser caching, there is another form of memory caching that helps in reducing the website’s loading time. This method is called “Server Caching”.
In server caching, the cache is created in the server rather than in the browser (client-side). The files requested by the browser will be stored in the server cache so that the database requests by the server for the same files are reduced. This ultimately results in increasing server speed and reducing server response time.
Once the server cache is in place, the stored content will be available to the user readily. But this will work as long as the website content remains the same. If any changes are made on the website, then the cache has to be refreshed accordingly.
By default, the server caching of published content is not enabled. You have to enable it manually in the storage layer configuration file. The entire process is described below.
- Open cd_storage_conf.xml storage layer configuration file in the XML editor.
- Locate the ObjectCache element and set the Enabled attribute to “true”.
- Locate the ItemTypes element and set the cached attribute to “true”.
- Save and close cd_storage_conf.xml.
- Repeat the above steps for each of your Content Delivery Server Roles that uses the cd_storage_conf.xml storage layer configuration file.
- Finally, restart your web application, Windows service or Java process, and you will have successfully enabled server caching.
3. Optimize Images
While image optimization is essential for SEO, it is equally crucial for the site’s speed optimization.
The first thing that you have to keep in mind while optimizing an image is the dimension of it to be displayed on the webpage. Make sure that the dimension of the image uploaded on the server is the same as the dimension of the image you want to display on the browser.
If you have a large image on the server, which will ultimately be shown as a smaller one on the browser, it will take the server and browser precious time to resize and render. So, do the resizing of the images as required beforehand and save your server and browser the trouble. Apart from Adobe Photoshop or similar desktop applications, several online tools are available, which you can use to resize the image dimension.
The next thing that you have to take care of is image size. Similar to the file size affecting the response time of the server retrieving it for the browser, the size of an image also plays a big role in the loading speed of a website.
Smaller the size of an image means lesser the time the browser will take to download it. To achieve that, just like the Gzip compression, you have to compress the image file to reduce its size.
Image compression does not affect the quality of the image as such. Instead, it just reduces the size by removing the EXIF (Exchangeable Image File Format) data.
EXIF data is the stored data in an image, which gives you the technical information about it like the shutter speed, aperture, focal length, etc. When these data are important for a photographer, they are not necessary for a website. So, the EXIF data of an image can be removed to reduce its size further.
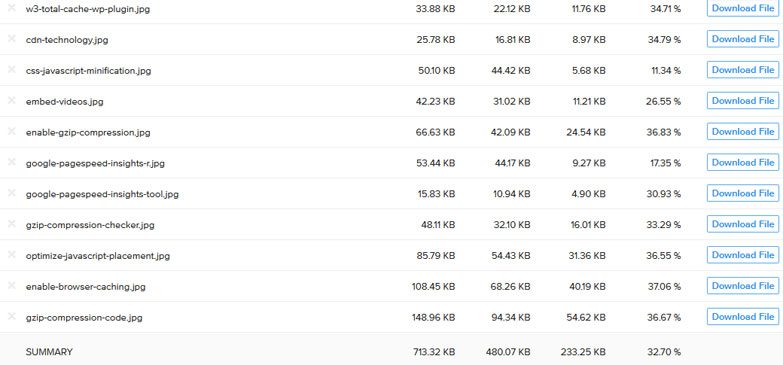
There are many tools present online, which optimize the size of an image by compressing it. A few of them are Kraken.io, JPEG Optimizer, Optimizilla, CompressNow, Online Image Optimizer, JPEFmini, etc. You have to upload your original image, after which you will have the option to compress it.
After the image dimension and size optimization, you have to make sure that the images you are using are responsive to various devices and screen resolutions. Use the “srcset” image attribute to dynamically serve images on different screen sizes. This can significantly improve your website’s speed on smartphones and other mobile devices.
Next to this, you should enable the image lazy-loading technique, especially if you have multiple images used on a webpage. The image lazy loading lets the browser defer the downloading of the image until it gets visible into the users’ viewport area. This significantly improves the site’s speed and user experience.
If you use WordPress, you have good news. WordPress 5.4 which is going to be rolled out tentatively on March 31, 2020, will have an in-built lazy loading feature for all the images that are host on WordPress.
The selection of the image file format is the last crucial aspect while using images on your website. Always make sure that the images are uploaded in the right format. Ideally, for static images, use the JPEG file format or progressive JPEG, for graphics, use PNG, and for animation, use GIF. You can also consider using the WebP image file type for obtaining the smallest image size while maintaining the best quality of it.
Visual impact plays a vital role in increasing traffic and sales. So, images play a crucial part in the success of your website. And to take advantage of them properly, you can incorporate as many images as you want in your website’s content. But always make sure that they are correctly optimized so that it does not compromise your website’s loading speed.
4. Implement CSS Minification
The size of the code also impacts the speed of the website: bulkier the code, the more time it takes for your website to download.
The best solution for this problem is reducing the code size. By removing redundant data like spaces, comments, and unnecessary characters, the final output of the code remains intact while reducing the size of the code considerably.
This entire process is called “minification”. The comments, spaces, and redundant characters in code are mainly present to ease the human readability. As your website does not require them to read and execute the code correctly, they can be removed to obtain a smaller code size.
All websites vary based on their platforms, but there are tools present online, which will help you minify your CSS code irrespective of the platforms.
Two such CSS minification tools that you can use for your non-WordPress websites are:
- CSSCompressor.net – This tool provides 4 levels of compression for your code. Depending upon the data space you want to save, you can choose among the 4 levels to get the desired result. After compression, you can simply download the compressed code, copy and paste it to your website. This tool also provides the number of bytes saved after the compression, for your reference.
- CSSMinifier.com – This is another online tool similar to CSSCompressor. But unlike the first one, there are no levels of compression here. You have to upload your code, press the compress button, and finally download the minified version.
If you have a WordPress website, then you can do the minification by using plugins like Autoptimize, SG Optimizer, and WP Super Minify. However, any good cache plugin will do the job for you. So, you don’t have to use any third-party tools or extra plugins to minify the CSS codes.
All other major CMS websites offer CSS minification plugins to choose from, some of which are mentioned below:
- Joomla – JCH Optimize
- Drupal – Advanced Aggregates Minify CSS module
Manual minification is another option. If you have a relatively small custom-built website with a few CSS files, and if you are well versed with the code, then you can minify your CSS code yourself without using any tools or plugins.
Whichever method you pick for doing the job, there are a few points to keep in mind while minifying the CSS code:
- Before minification, keep the original CSS code intact by saving it somewhere safe. This will help you in troubleshooting later on if required. In case, you have a WordPress website, do consider taking a full backup of it before minifying the CSS.
- Always use reliable tools for minifying your code. If in any way, your code gets mangled, then your website will suffer. So, be sure of the tool or plugin you are using before making any changes.
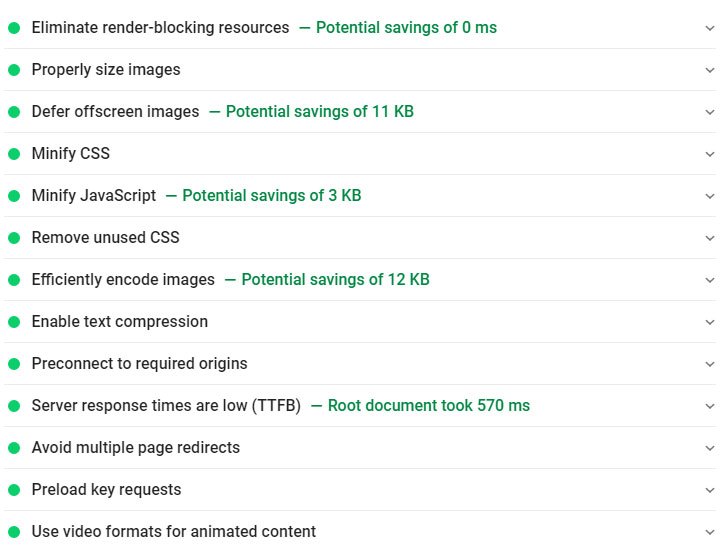
After the minification of your CSS codes, you will notice improvements in your website’s loading speed. To properly analyze it, you can use the Google PageSpeed Insights tool to check your website’s performance.
5. Implement JavaScript Minification
Just like minifying the CSS code, you can also minify the JavaScript code to improve the loading time of your website.
Minification here again entails removing unnecessary characters, lines, and codes from the JavaScript file. Reducing the size of the JavaScript code means, lesser time the browser takes to download it from the server, which means less loading time.
Your website does not need a “human-readable” format to read the JS code and execute it. Placing all the code in one line will work just as fine as a readable code format. So, removing the whitespace, comments, and unnecessary special characters won’t make any difference to the output. Shaving off the excess code will decrease the file size and increase the website speed.
For WordPress websites, you can use the Fast Velocity Minify plugin to minify the JavaScript, CSS, and HTML files. However, as I said earlier, a good caching tool like W3 Total Cache will do the minification job for you quite easily.
If you are looking for an online tool to do the job for your non-WordPress website, you can use JSCompress.com. It works similarly to the CSSMinifier, discussed in the previous section.
The same precautions as in CSS minification you should apply here. So, be careful while making changes to your JS codes.
6. Optimize JavaScript Placement
Starting from serving dynamic data to webpages to adding special effects to your website, JavaScript has several crucial jobs to do. Though it lends a visually compelling and eye-catchy look to your website, it comes with a price.
JavaScript codes rely heavily on JavaScript libraries that are huge and take a lot of time to load. Besides, JavaScript is a single-threaded programming language, which does not load in parallel with other components like HTML.
If you have external JavaScript files at the top of the source code, the browser will stop parsing the remaining code once it encounters the JS code, unless it is downloaded, parsed, and executed.
This means waiting for the JavaScript codes to load and execute, following which the browser will get to the code below it.
The results of this are a less responsive, sluggish website and an unhappy user.
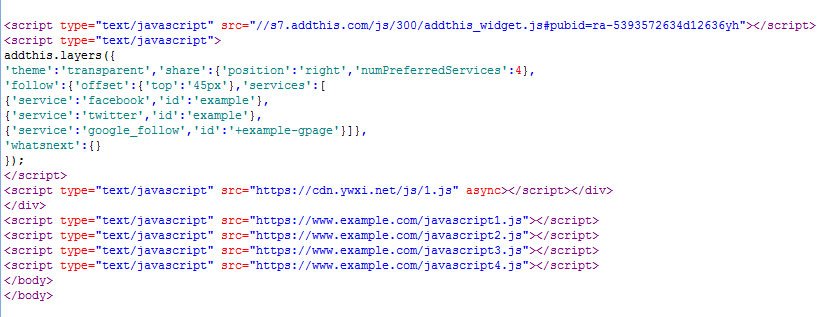
To remedy this problem, you need to place the JavaScript at the bottom of the code, just above the “/body” tag. This allows the browser to continue progressive page downloads. As long as the user sees the page loading, considers it responsive, and gets the “First Meaningful Paint”, the add-on effects lend by heavy JavaScripts could be loaded at the end.
Cramming the render-blocking JavaScript and CSS codes, in the beginning, is counter-productive and can significantly slow down the responsiveness and loading of your website.
So, place the core files at the start, and all the effects can load later. In addition to this, also consider using the asynchronous JavaScript codes that do not block the browser downloading the main thread.
7. Use CSS Image Sprite
There could be many small images on a website, which are used multiple times on several pages. These images if stored separately will increase the page load time because they have to be called individually every time a webpage loads.
To save time from being wasted on multiple HTTP requests for each individual image, CSS image-sprites are used to combine multiple small images in one master image. This way, instead of many, one image will be downloaded every time a page loads, thus increasing the loading speed.
There are many options available to create the master template or the image sprite. You can use plain old Adobe Photoshop or a readymade sprite generator online. One such online tool is SpriteMe (spriteme.org).
After combining all the images into one image, download it and apply it as a background image to the correct element on the website. Then choose which part of the image you want to display based on the HTML element using the background-position property.
One example of such an instance where image sprites come handy is the social media buttons that are always present in all webpages of a website. You can use image sprites to combine the social media logo images into one image. And then use the background-positioning to display each logo with respect to their link.
CSS sprite can save a significant amount of bandwidth by reducing the HTTP calls and thus increases the website’s speed. However, do not apply this technique to the images that you want to rank for Google image searches.
8. Consolidate CSS & JS External Files
The CSS and JS files take up a lot of server time when called individually. This, in turn, increases the server latency time and thus decreases the site’s loading speed.
A simple remedy to this problem is to combine all the CSS files and JS files into one CSS file and one JS file, respectively. So that an HTTP request will be enough to call the entire CSS/JS file at once rather than calling them individually. This reduces the number of HTTP requests that a browser makes to the server, which invariably speeds up the loading time of the website.
Similarly, multiple JS files could be combined into a few JavaScript files to save up on time and make your website faster and more responsive.
9. Keep the Number of Plugins Low
Till now, we have talked about a lot of plugins (mainly for WordPress websites) that come in handy while doing a plethora of jobs from compressing codes to optimizing them.
While there are plugins that are absolutely necessary to enhance the performance of a website, there are many that though being useful are not the must-haves.
Using multiple plugins can be helpful in many ways, but they also add additional CSS and JS overheads that can severely decrease the website’s speed. The more the number of plugins, the more is your loading time. So, don’t use a bunch of plugins just because you can, as it will cause you more harm than good.
Keep the plugins that you can’t live without like the Yoast SEO, W3 Total Cache, etc. and deactivate and delete the rests. It will shave off the load on the server, and improve the site’s loading time significantly.
Besides this, make sure to keep your plugins updated to improve the website’s security and loading speed.
10. Reduce the HTTP Calls
Every time a user opens a website or clicks on a link, there are a lot of HTTP requests being sent to the web-server behind the scenes. HTTP calls are costly, server-dependent, and take time to process. Thus, overdoing this results in a slower website, and somehow you need to reduce the HTTP calls.
There are many ways to accomplish this particular feat:
- Use the CSS image sprite to reduce the number of HTTP calls, instead of requesting them for each image individually.
- Consolidate all CSS and JS files into one CSS and JS file, respectively, so that they can be called all at once.
- Instead of using synchronous JavaScripts, use them asynchronously.
- Browser and server caching are other ways through which you can minimize the number of HTTP calls.
- By inlining the JS and CSS codes in HTML, you can limit the number of HTTP requests. Be careful, though. This can significantly increase the HTML size, which can adversely affect the site’s loading speed.
By applying the tricks as mentioned above, if you can curtail the number of HTTP calls requested by a browser, you can dramatically boost the speed of your website.
11. Leverage CDN Technology
CDN, also known as the Content Delivery Network, is the technique to decrease the server latency time for users irrespective of their geographic locations.
A user can access your website from anywhere around the world. If the user is located geographically near to your server, then the server latency time will be comparatively lesser than the user situated in the opposite corner of the world. This is because the server latency time depends on the geographical distance between the visitor and the web-server.
But as you have no control over your users’ location, what will you do to ensure that all the users of your site experience a fast website irrespective of where they access it from?
The answer to this is CDN.
CDN works as cache servers for the content of your website, which are located in multiple geographical locations all around the world. This network of distributed servers ensures that the distance between the users and the server is always short, and the user gets the requested resources faster than ever.
Multiple caches sprinkled all around the world make the users’ location less important, which thus reduce the server latency time, giving your website a universal speed boost.

Image Source: cloudflare.com
If you are a global business with your target customers spread all around the world, then the CDN technology is a must-have for you.
There are both free and paid CDNs available online. But if you are serious about using it for your website, my advice will be to go for the premium CDNs.
Bonus Website Speed Optimization Tips
12. Reduce the URL Redirection Chains
Unnecessary redirection chains can slow down your website significantly. This happens when you migrate from HTTP to HTTPS or move your website from www to non-www (or vice versa). If you encounter a 404 page on your website, make sure to redirect it properly to the exact version of the page (URL) you want to redirect it to. You can use tools like Screaming Frog to identify the redirect chains and redirect loops to resolve the issue.
13. Embed Videos
Never host videos on your website. Videos generally are large and if hosted on the website will eat a lot of server space and bandwidth, which in turn can decelerate your site’s speed. Instead, host them on YouTube and further embed them on your website. This will serve your purpose and at the same time won’t affect your site’s loading time.
14. Update the Software, Plugins, and Tools
Make sure that all the software, plugins, and tools you use are up to date. If you are using a WordPress website, do visit the WordPress updates section on the WP dashboard and reconfirm that your WordPress software, along with the plugins and themes are up to date. Besides, for WordPress or a PHP website, doublecheck if your server is using the latest PHP version or not. Keeping your software, plugins, and tools updated not only speeds up the website but also improves the security of the site.
15. Keep Your Website’s Database Optimized
Optimizing the site’s database will make it more responsive and faster. For WordPress websites, you can use plugins like WPRocket, and for a custom website, you may have to monitor the database manually and remove the data that are not required for the site.
16. Optimize the HTML
HTML is the backbone of a website, and if it isn’t properly written or optimized, your site will eventually be slow on browsers and mobile devices. To remedy this problem, use an optimized theme or code for your website.
17. Reduce Server Response Times (TTFB)
Time To First Byte refers to the time at which your web server first responds to the request created by the client-browser. When optimizing the above factors will reduce the server response time significantly, you may also consider moving your website to a more efficient server that guarantees a better TTFB.
18. Remove Render-Blocking Resources and Unused CSS
There can be a few resources that are constantly blocking the first paint of your webpage. Consider deferring them, serving the critical ones inline. You can use Hummingbird, Autoptimize WP plugins to solve the problem. And if you are already using the W3 Total Cache plugin, set it correctly so that it can take care of these issues efficiently. Additionally, you should also make sure to inline the CSS that are important for the above-the-fold content and defer the rest unused CSS loading.
19. Make the Default Text Visible During Webfont Load
Apply the Font-display CSS feature to make sure that your default text fonts remain visible during the webfont load.
After applying all the site’s speed optimization techniques mentioned above, if you still can’t see any significant improvements in your website’s loading speed and time, it’s time to move your site to a better and more efficient and resourceful server.
If you are running your website in a shoestring budget or bootstrapped your business, you may have to stick to a shared hosting server. But find a better one or at the very least, upgrade to a better hosting plan that will not kill your bank but will speed up your website.
And, if you can invest more on your site’s hosting, go for the dedicated or VPS (Virtual Private Servers) servers. These are costly but offer the best results in terms of websites’ speed, stability, storage, bandwidth, and security.
Wrapping up
There you go guys, the most crucial ways through which you can increase the speed of your website. If you have not already employed these techniques on your site, it’s high time, and you should start applying them now.
With each second of improvement in your website’s loading time, you will clearly see the changes in the traffic influx to your site, and most importantly, in the sales conversions and SEO rankings.
User satisfaction is mandatory when you own an online business because, without it, your ranking will fall and plummet the image of your brand as well. A fast and responsive website is what you need to keep your visitors interested in your brand, as well as reduce the bounce rate.
It can be a challenging job to optimize the loading speed of your website, but I can guarantee that employing the above-explained methods will get you significant improvements. Keep working at them, and you will see the changes firsthand.
Do comment below about the problems you faced while optimizing your website’s speed? And also let us know the positive results you obtained after applying the site’s speed optimization techniques.
An advanced All-in-One Digital Marketing Course.
Mentored by Mr. Soumya Roy, the Founder, CEO of PromozSEO Web Marketing Academy.
- Reasons Your Business Needs to be on Instagram - September 16, 2021
- 7 Reasons Your Business Should Invest in Professional Content Creation - August 12, 2021
- 5 Ways You Can Improve Your Website’s Existing Backlinks - April 30, 2021

