11 WordPress Optimization Techniques to Dominate the Search Engine Results
Are you wondering why your WordPress posts are not gaining any traction after publishing them online? Are you disappointed with the number of views that your posts are getting or their overall ranking in the Google search pages?
Well, the answer to all of your questions can be rooted in one particular action, specifically something that you are either doing but not properly or not doing at all. And that one thing is SEO.
Optimizing your content is a must if you want Google to rank it. If you follow Google’s SEO guidelines and take care of all the nitty-gritty thoroughly before publishing your post, then your content will rank and gain popularity as you intended it from the beginning.
We all know SEO is imperative and a must when it comes to ranking and long-term profitability, but it’s not that simple if you don’t know what makes a content search engine optimized and at the same time, user-friendly.
So, the question is what are those things that you need to adjust and tweak in your content to make it properly optimized for ranking?
Not to worry, as in this article we will provide a comprehensive list of all the dos and don’ts in a WordPress post, to make it fully optimized for Google and eventually rank it.
So, without any further ado, let’s head straight to the topic.
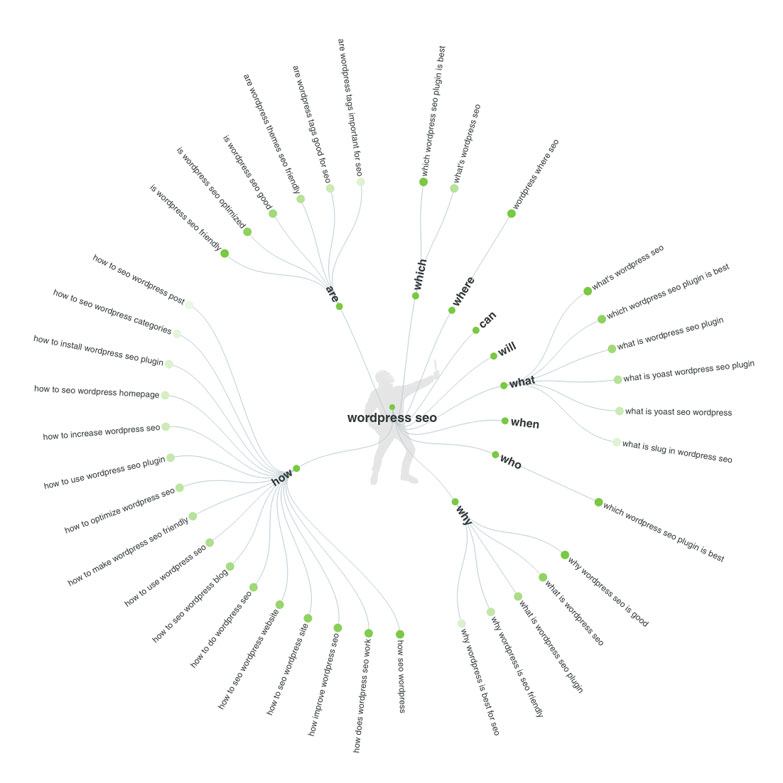
The very first step before you start optimization is knowing the relevant keywords that your content will target, how effective they are and how often they are searched by online visitors.
What are Keywords?
Keywords are the search queries or phrases in your content that make it possible for people to find your content while searching on search engines like Google.
People use search queries while looking for a product, service, or information that you have served on your content. You need to know them in advance so that you can incorporate the phrases on your content to rank it high on search engines. If you fail to do so, the visitors are most likely to land on a different website that is using these keywords to lure them in rather than yours.
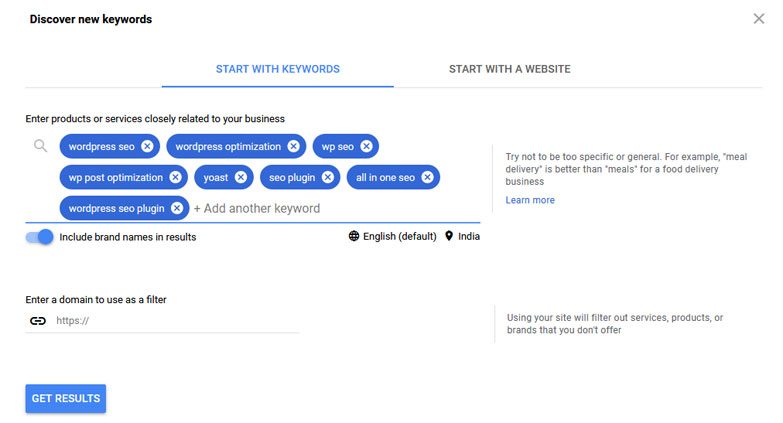
Gathering the relevant keywords pertaining to your content is the first and foremost step of SEO. And to do so, you can analyze and generate a set of relevant, high search-volume keywords using tools like Google Keyword Planner, UberSuggest, etc.
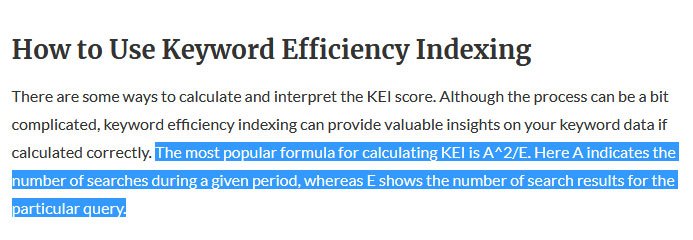
You can sort the keywords on their search volume and KEI (Keyword Efficiency Index) to measure profitability and rank-ability. Make sure to identify the keyword that has the maximum relevancy, highest search volume and KEI. We call it the primary keyword or focus keyphrase. Once you have the final list of keywords in hand, you are ready to start composing your content.
1. Optimize the Post Name (H1)
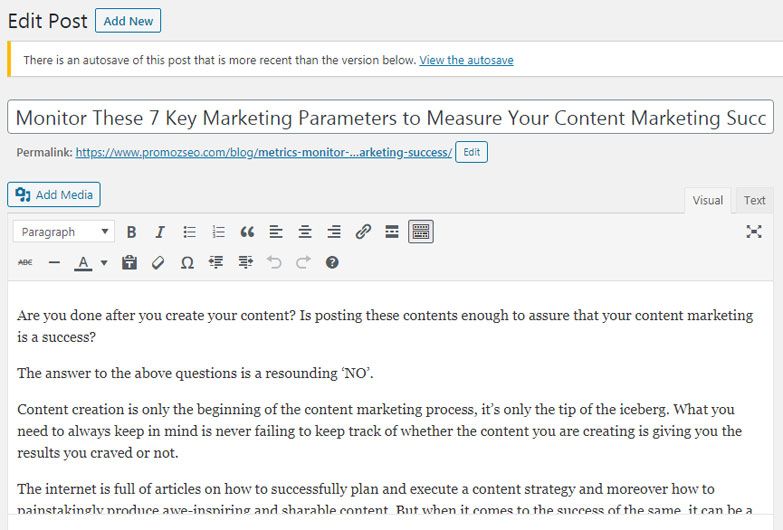
The first thing that you need to do while creating a post on WordPress is giving it a name. This is going to be the primary header (H1) of your post which will be visible to your readers.
The H1 should have the primary keyword from your prepared keyword list. You can also use the second-best keyword or secondary keyword along with the primary one on the post name section but that is optional.
Make sure that your primary keyword is present as early as possible in the H1, preferably in the beginning, else it will be less powerful.
More than two keywords from your keywords’ list can be present in the post name with the primary keyword being at the start. But always make sure that the H1 is reader-friendly and well represents the purpose of your content.
2. Optimize the Permalink (URL)
After you are done with the H1 of the post, it is time to optimize the permalink or the URL of the content.
Before you do anything, first go to the WordPress Permalinks settings and select the post name option.
Now as the permalink is set as the “post name”, ideally it shouldn’t be longer than 55 characters including all i.e. the protocol, domain, and the slug.
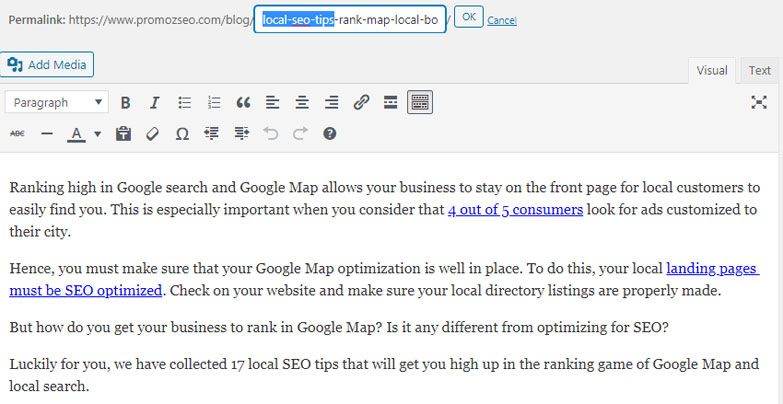
Only the slug of the URL is editable. To rework and better optimize it, you need to use the primary keyword at the beginning of the slug if possible. And also make sure that the topic of the post is clear from the URL.
The URL must be made in lowercase letters, and it should not contain any stop words like a, an, the, but, of, from, etc. Google considers stop words as fluff and ignores them while crawling and indexing a URL. So, including stop words is considered to be a poor SEO practice. Besides, never use a space or underscore to separate words in a URL, instead use a hyphen.
Final word, a short URL that uses the primary keyword and describes the content clearly is considered to be a well-optimized URL.
3. Optimize the Content
The body of the content is your main asset when it comes to WordPress post optimization. It should contain all the relevant information that your audiences are looking for. So, you have to be very particular about the quality of the content in terms of relevance and value addition.
The key points that you need to follow and implement while optimizing your content are:
- Proofreading the content
The content should always be written in proper English without any grammatical errors or spelling mistakes. The vocabulary used should be simple without any over-complicated words. Sentences used should not be too wordy or complex with each paragraph being no more than 5 sentences long.
You may use tools like Grammarly or Hemingway App to proofread your content.
- Check the Quality and Plagiarism
The quality of the content is the most essential aspect when it comes to its overall success. If your content fails to add value to your readers’ life then they are most likely to skip it, even if it has dozens of rich media in them. So, before thinking about sprucing up your content by adding embellishments like images and GIFs, make sure that your written content is worth reading.
Next comes the uniqueness of your content. Google always rewards original content. If you are copying content from another online source, Google will not attach much importance to your content, will treat it as a duplicate of an already existing one, and needless to say won’t rank it. So, always be sure to create content that is unique and original and not a copy of someone else’s work.
If you don’t write your content by yourself and mostly outsource the writing part, make sure to confirm its originality using plagiarism tools like Copyscape before posting them online.
- Use Keywords Evenly Throughout the Content
Ideally, a well-optimized content should have keyword density anything between 2 percent to 4 percent. And you can use the primary keyword nearly 0.8 to 1 percent time of your total content length (word count).
Now for an example, if you have a 2000 words’ content, you can use all of your keywords 80 times maximum, when only the primary keyword can be used around 16 to 20 times. Remember, content writing or optimization is not mathematics, hence use keywords contextually that come in the natural flow of your writing. Overusing them or stuffing them with an intent of optimization will eventually do more harm than good.
The primary or the focus keyword should be present in the first sentence of your content preferably at the beginning. In some cases, if it isn’t possible at all, try to use it as early as possible on your content. Similarly, you should also use it in the last sentence of the content as well.
The secondary keyword should be present first in the second paragraph of your content but again it should be used contextually. If it does not fit there meaningfully, don’t use it compromising the flow of writing.
Make use of the other keywords evenly throughout the content. Don’t repeat the same keywords again and again, instead use keyword variations, LSI (Latent Semantic Indexing) keywords, wh keywords, etc. to make the content more human-readable.
Another important feature of any written content that is good for SEO and also a fan-favorite is “List”. A list is an easy and efficient way to showcase data, steps, and processes. So, it is highly advised to have more than one list in your content. Without writing cumbersome paragraphs, break them down into small paragraphs and lists, and your content is good to go. Make sure to incorporate a list as early as possible in your content. From an SEO point of view, it is a must.
- Write Long-form Content
Long-form content has numerous advantages. To list a few:
Higher online visibility – Long content establishes you as a thought leader or a domain expert in your field. This leads to more people seeking your content thus increasing visibility and more organic traffic.
More social sharing – Usually a longer content means more information regarding a subject that will lead readers to share your content more.
Better link building – Long-form content naturally attracts more backlinks than its counterpart. Thus improves its organic ranking on major search engines like Google.
Website Domain Authority – As long-form content helps in acquiring authority backlinks naturally, this not only ranks the content high on search engines but also increases the Domain Authority of the site.
Improved user metrics – Usually, a well-written and well-structured long-form content keeps its readers firmly engaged, thus increasing the user stay time, page-views, and reducing the bounce rate. Improving these user metrics tell Google that your content answers all the user-questions and therefore, deserves a better organic ranking.
Improved ranking and conversions – Generally, longer content gets better sales conversion rates. As longer content ranks higher, naturally it attracts more organic and targeted visitors toward it. As it gets more search engine traffic, naturally it enjoys a higher conversion rate.
Remember, over a long period of time if you can continue creating long-form content that will certainly be much more profitable than the rest. However, your ultimate objective of content creation should always be adding values to your readers and empowering them.
4. Optimize the Paragraph Headers
If the post-name of the WordPress post is H1, the paragraph headers on the content can be marked as H2, H3 and so on till you reach the H6.
The secondary keyword from your keyword list must be used in the first paragraph header which should be an H2. Similarly, you can use the other keywords in your list as H3, H4, etc. But keep in mind that no two paragraphs should have the same keyword in their headers. Use variations of the same keyword but not the exact same thing time and again.
A paragraph header should reflect the gist of its next paragraphs clearly. So, make sure that it is reader-friendly while incorporating the keywords.
Another important point to note, the format of all paragraph headers preferably should be same throughout the website or at least for a particular content.
5. Optimize the Image
Well-written content is fine and well, but when it comes to attracting readers’ attention as well as to better explain the content, images are imperative. But this does not mean that you will download a random image from the internet and use it on your content. Images have to be chosen carefully and have to be optimized even more carefully before they can be used on the content.
The key steps for image optimization are:
- Download Copyright-Free Images or Custom Create Images In-house
The Internet has a huge cache of copyright-free images. The most notable websites that provide this service are Flickr, Unsplash, Pexels, Freerange, etc. These websites have a huge collection of stock photos that you can browse and choose from according to your requirements, and most importantly without having any trouble afterward.
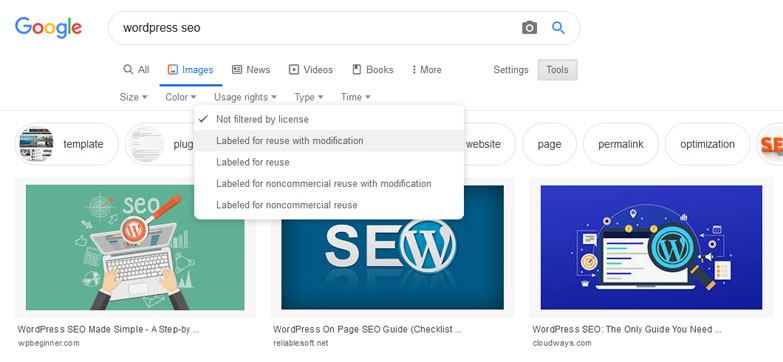
You can also use dear old Google images for this purpose. But make sure you choose only those images that are classified as “labeled for reuse” or “labeled for reuse with modifications”. Don’t ever just pick any image without checking if they are copyright free or not, else your website may land in some serious trouble later on.
Another option for an image source is creating a completely new image of your own. You can do that by using software like Adobe Photoshop, Illustrator, etc. It would be completely unique and perfectly tailored for your content.
- Resize the Image to the Dimension You Want to Show on the Webpage
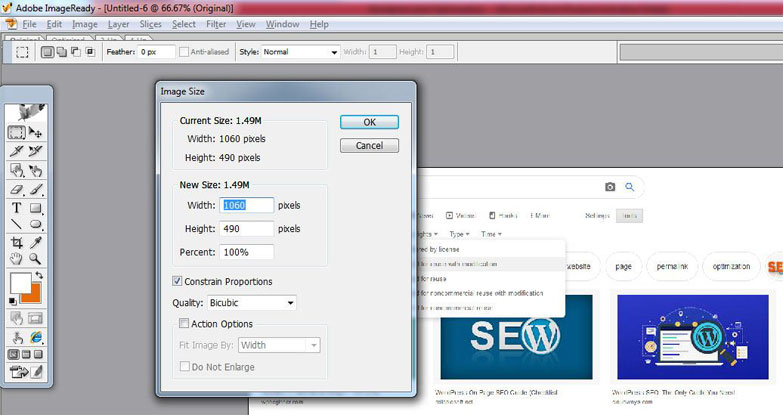
Most of the time, people commit mistakes here. See, you should know in advance the maximum image-dimension (width mainly) that you want to show on the browser or on mobile screens. And if you do not consider this, you may end up using a wrong image either having a much larger dimension or smaller than you actually need.
After you download or create the image you want, you have to resize it accordingly to suit your content. You can resize the image using Photoshop or other image processing applications readily available on the internet without affecting its quality and aspect ratio.
Doing this for your website images not only saves your site’s bandwidth but also reduces the image file size, and thus improves the site’s loading speed.
- Add Relevant Text to make it Unique
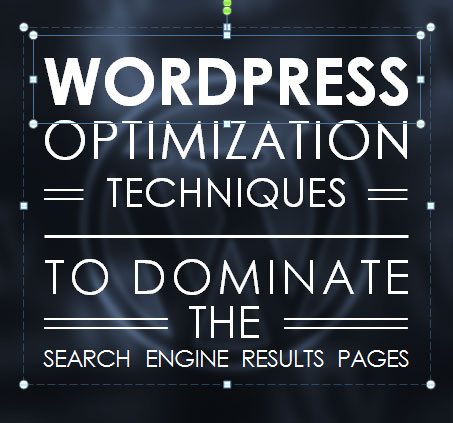
Just like written content, Google prefers unique images too. As Google cannot perceive an image and distinguish between two like a human, it relies on texts added to an image to map and index it properly. So, if you have a copyright-free image downloaded from a source, you need to add text to it to make it unique before using it on your content.
You can modify an image by editing and changing its color scheme, but the simple yet effective method to modify an image is by adding a relevant text to it. The easiest way to add a text to an image is by using Photoshop. Another alternative being the website AddText. Just upload your image to the AddText website, add a text contextually relevant to the image, and finally download the modified image to your desktop. Easy and hassle-free.
The text that you add to the image may have the primary keyword or its variation along with other relevant key phrases that describe the topic clearly. This is very important and should be kept in mind while executing this step.
- Compress the Image File Size
An image may contain many additional metadata that include shutter speed, aperture, ISO, date and time, color contrast, etc. These stored data are called the “EXIF” data or Exchangeable Image File Format. This extra information adds on to the size of the image and is not at all required when being used on content.
So, to further reduce the size of the image you can use tools like Kraken.io or Optimizilla.com that deletes the EXIF data from an image. The process is very easy and straightforward while giving the exact results you want. Just upload the image to the tool, afterward it will start compressing the image, and finally, you can download the compressed image with reduced file size easily.
- Optimize the Image File Name
The image that you have got right after the previous step is the image that you will upload to your WordPress post. But before that, you have to optimize the image file name. Edit the image file name and rename it using a keyword that is relevant to both the image and the post topic. Besides, don’t keep a stop word there.
Keep in mind that the image file name should not have any space in it. So replace any space with a hyphen. And all letters should be in lowercase.
- Upload the Image
Now it’s time to upload the optimized image. Once you upload the image it will appear on your WordPress editor. Next, align your image based on your content layout.
If you want to use more than one image on a post, repeat the aforementioned image optimization steps for all of them.
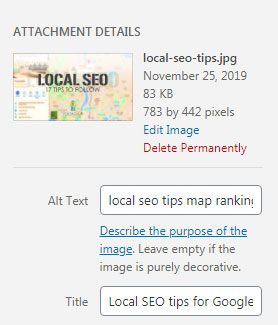
- Optimize the Image Alt
Now to further optimize the image, you have to edit it and add an alternative text (alt attribute) to the image. Again a keyword should be present in the alt text, all in lowercase, and with space between words (no hyphen like in image file name).
- Optimize Image Title
When editing the image, below the image alternative text, you should see the advanced options under which you will get the “image title attribute”. You will again use a keyword for this but in a different format. Image title attribute ideally should be in the sentence case. This means the first letter should be in capital, a proper noun should start with a capital letter, an abbreviation must be in uppercase, and the rest of all should be in lowercase.
The image title will become visible to the reader when he hovers his mouse cursor on the image. So, unlike image alt attribute which may consist of a keyword, image title should be user-friendly and descriptive.
6. Optimize the Internal Links and External Links
Content without any internal link is called a “orphan page” because it won’t have any inner link for google to crawl another page of the same website. This is an immense loss on the part of the site owner. So, the inclusion of a few relevant internal links as well as a couple of external links in every post is a must.
Ideally, the first contextual link should come from the second or third paragraph of a post.
The links must be contextual, this means that you have to choose a phrase (anchor text) to link another page that contains content relevant to the anchor phrase. In simple words, the anchor text phrase must be relevant to the linked page topic.
It is suggested that the first and the last contextual link on a page point to internal pages i.e. a link that leads to a different page of the same website.
Apart from the internal links, a few relevant outbound links should also be added from a post. An external or outbound link is a link that leads to a page outside your website. You can choose a well-written article that is somewhat related to your content to use it for external linking.
Make sure that the intent of the linked article is not exactly the same as your present content (or linking page). This means that you never use an anchor phrase that you are targeting from your current content to create a link. If you do so, Google may consider that the linked page is more relevant to the anchor phrase than the linking page. Naturally, this type of linking may hamper your own page’s ranking and certainly, you don’t want that.
Another no-no while linking is, never add a link to your content, which leads to the same page. Meaning, linking page ‘A’ from the page ‘A’ is simply not done. Also, preferably, you should not link a page more than once from the same content, unless it is the Call-to-Action link. Choose a different page for your next link and so forth.
In the WordPress post editor, choose the anchor phrase you want to link to, and click the “insert/edit link” option. A small popup will appear. Next, copy the URL of the page from the browser address bar, which you want to link to, and paste it there. Remember, never try to type the URL, always copy and paste to avoid any error in the link. Else, mistakenly you may end up linking to a 404 page.
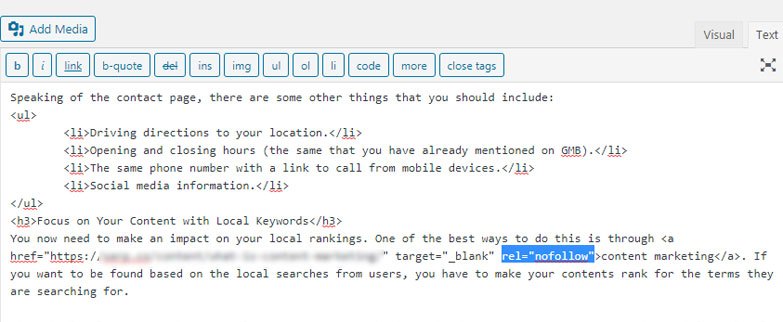
The default link in WordPress is “dofollow” which allows the PR (page-rank) flow from the linking page to the linked page, thus increasing the linked page PR. If you do not want that, you can go to the WordPress post “text” editor, and change the link to “nofollow” by adding the rel=“nofollow” tag manually. You may also use a WordPress plugin for doing this on your behalf.
a href=“http://somelink.com” rel=“nofollow”>Anchor Text</a>
You may also consider checking the ”Open link in a new tab” option while linking to an external page. Doing this will add the target=”_blank” attribute to the outbound link, which will finally open the external page in a new tab. It is a good practice as it keeps your page open on the browser and may not increase the bounce rate.
7. Optimize the Category
The category section is present on the right-hand side of your WordPress post editor. Categories do not mean the keywords, instead, a category means the topic of the article. By default, a post is uncategorized which you should always change. Either you create a new category that matches your current post topic or select a relevant one that already exists there in the category list.
For example, if you are writing a post on “Monitor These 7 Key Marketing Parameters to Measure Your Content Marketing Success” then your primary category should be “Content Marketing”.
8. Optimize the Tags
Just below the WordPress Categories, you have the “Tags” section.
Tags are similar to categories except that here you can use a few short keywords. A tag should always be in lowercase, and 3 to 4 tags that represent the post topic clearly are good for WordPress post optimization.
9. Optimize the Meta Data (Yoast Section)
Yoast is one of the best SEO plugins for WordPress, which helps you analyze your content before publishing, and determine if it is properly optimized or not.
The Yoast SEO section is present at the bottom of the WordPress post editor. Here you can input the “Focus keyphrase”, edit the SEO title and Meta description, mention the Breadcrumbs Title, etc.
- Focus Keyphrase / Focus keyword / Primary keyword
In the latest WordPress version, Focus Keyphrase comes at the top of the Yoast SEO plugin. Here you have to input the primary keyword that you have found after the keyword analysis, and used several times on your content.
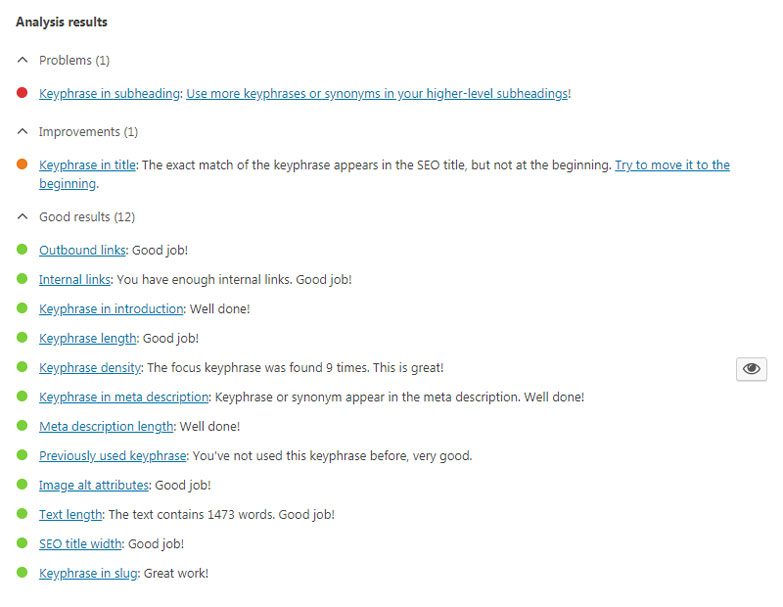
Based on your primary keyword, Yoast will analyze the level of your WordPress post optimization. The plugin will subsequently list down the analysis results which will further help you make the necessary changes.
- SEO Title
When you click the “Edit snippet” button at the “Snippet Preview” section, the first thing you will see is the “SEO title” which is nothing but the page title of your content.
By default, the SEO title will be the same as the Post name (H1). Nonetheless, you should change it, because the H1 and the page title should never be exactly the same for the content.
SEO title or page title is one of the essential SEO factors for organic ranking. You must use the focus or primary keyword in the SEO title, preferably at the beginning of it. If possible, you may try using another keyphrase without being too much wordy.
SEO title has a character limit. It should be a minimum of 45 characters and a maximum of 65 characters. While optimizing it, just make sure that the SEO title doesn’t turn red, and you are good to go.
Besides its influence in search engine ranking, SEO title also plays a major role in enticing people clicking on your link instead of your competitors. So while optimizing the SEO title, apart from the keywords, also use a few words that are psychologically more powerful and persuasive than others.
Use the word “You” – Using “you” in SEO title, you can instantly relate to your readers, which in return helps you get more clicks. This increases the Click-Through Rate (CTR) and can dramatically improve your organic ranking.
Use the word “New” – “New” is a really persuasive word. Everyone wants to read and experience something new that they haven’t yet seen. Therefore, using “new”, you can indeed excite people to click on your link on search engines as well as social media channels.
Use the word “Now” – “Now” creates a sense of urgency. Book Now, Hire Now, Get Now, all these will drive more clicks on your link.
Use the word “Free” – “Free” word excites almost everyone. Hence, if you can use “free” astutely, you may get surprising results in terms of increased clicks and CTR.
When these words, and maybe a few more like these are emotionally powerful, you should never use them for click-baiting. Remember, your one-and-only objective should be value-addition.
- Meta Description
Right below the SEO title, you will see the Meta description section.
The Meta description summarizes the page’s content, and search engines show the meta description text in their search results.
The primary keyword should be used along with the secondary keyphrase. You may also use a few more keyword variations as long as it is reader-friendly.
A Meta description can be a maximum of 155 characters and must be grammatically correct.
Remember, same as the SEO title, meta description also influences the CTR. So, use wordings eloquently to convince people to click more on your links.
- Advanced
Under the advanced Yoast plugin section, the first three options are Search index, Follow links, and Meta robots advanced. Do not mess with these three settings, else Google may not index your content and it will never rank on search engines.
The fourth option is the “Breadcrumbs title” where you may put the primary keyword.
The fifth option here is the “Canonical URL”.
What is the canonical URL and what exactly it does in SEO?
Well, a canonical URL is very important for SEO and the proper organic ranking of a page.
If you use CMS (content management system) like WordPress, or URL rewriting technique, you might have seen one content opening on more than one URL. This creates duplicate contents which may cause a little bit of problem in the site’s SEO and ranking. To eliminate this issue, we use the canonical URL.
When one content opens on multiple URLs, it becomes difficult for Google to identify the one URL it needs to index for that content. When you use a canonical URL, even if one content opens on more than one URL, Google will ignore the rest and index only the canonical URL version for that content.
In WordPress, you don’t have to do anything as the Yoast SEO plugin will use the same permalink as the default canonical URL on its own.
10. Optimize the Facebook and Twitter Page Title and Meta Description
Yoast SEO plugin’s Social optimization section lets you input and optimize Facebook and Twitter title and description.
Under Facebook, you have three sections “Facebook Title”, “Facebook Description”, and “Facebook Image”.
Optimizing these is really simple. Copy the SEO title and paste it in the Facebook title. Similarly, copy the Meta description and paste it in the Facebook description field. Next, select the first image that you have posted on your content and use it as the Facebook image.
For the Twitter title, description, and image, follow the exact same steps as mentioned above for Facebook.
11. Final Yoast SEO Analysis Check
Now your content is almost ready. But before you finally hit the publish button, you should invest a little more time on Yoast SEO analysis. Save your content as a draft and let Yoast thoroughly evaluate your content optimization.
As we told earlier, depending on your “Focus keyphrase” input, Yoast will analyze the post and let you know if you need to change anything in your content to improve its SEO.
When the green dots confirm the proper optimization, the orange and red dots tell that something went wrong, which you need to recheck and rework if necessary.
In addition to SEO analysis, you should also check the “Readability” score at the Yoast SEO plugin.
Once everything becomes green, voila, publish it now.
Wrapping up
So, that’s the entire SEO process that you need to follow for each and every WordPress post that you are going to publish next.
The entire WordPress optimization process can be a bit overwhelming and daunting in the beginning. But as you start following it regularly for all your WordPress posts, you will eventually notice that the steps will become second nature to you.
I hope, you find this article useful in upping your WordPress SEO game and getting the coveted ranking in SERPs.
An advanced All-in-One Digital Marketing Course.
Mentored by Mr. Soumya Roy, the Founder, CEO of PromozSEO Web Marketing Academy.
- Reasons Your Business Needs to be on Instagram - September 16, 2021
- 7 Reasons Your Business Should Invest in Professional Content Creation - August 12, 2021
- 5 Ways You Can Improve Your Website’s Existing Backlinks - April 30, 2021
