How to Migrate Website from HTTP to HTTPS – Redirect HTTP Site to HTTPS – The Definitive Guide

Running your website on HTTP in 2020 is a big no-no. In simple words, HTTP not only creates problems in terms of SEO, but it also leaves an inferior user experience.
So, if you are still running your website or blog on HTTP, let’s quickly migrate the site from HTTP to HTTPS.
Next, a few questions that may come to your mind are,
- What is HTTP?
- What is HTTPS?
- What are the differences between HTTP and HTTPS?
- What are the advantages and disadvantages of HTTPS?
- What to do before you migrate your website from HTTP to HTTPS?
- The next big question is how to redirect from HTTP to HTTPS?
- And finally, what should you do right after you host your website on HTTPS?
Here, in this post, I am going to explain each of the points mentioned above one by one in simple words, so that even a layperson or a beginner can easily understand the whole thing and migrate the HTTP website to HTTPS.
Now without any further ado, let’s head straight to the questions and the topic.
What is HTTP?
HTTP was introduced by the inventor of the World Wide Web, Sir Timothy John Berners-Lee, on 12 March 1989, where HTTP stands for Hyper Text Transfer Protocol.
HTTP is a data transfer protocol that a browser generally uses to communicate with the server. Though it’s not always a browser that communicates with a server, instead, there can be different other web clients like an online software, an application, or a device that may also communicate with the server.
In simple words, when you click on a link on a website or a desktop or web-based application, the web client sends the HTTP request to the server, telling it to respond with the necessary files and data. Next, the server processes the web client request and sends the requested files and data as a response back to the browser or the application. Finally, when the browser or the app receives the response, it starts decoding the data, and finally, presents it as a webpage.
Right, after the HTTP session is over, the server closes the connection as it only remains open during the state of the data transfer. However, HTTP/1.1 uses a persistent connection that is also known as the keep-alive mechanism, which keeps the client-server connection open for more than one HTTP request. The keep-alive mechanism also allows data to be streamed instead of buffered.
After the initial days, there have been a lot of improvements introduced, which made HTTP faster in processing the request and sending the response back to the web client.
If you are a website owner who wants to redirect his website from HTTP to HTTPs to serve the content over a secured network, you don’t have to essentially understand how HTTP works at its core and what the improvements are introduced right after its inception. Instead, just know that HTTP is the data transfer protocol that helps you get the content and data from the web server when you click on a link on a browser or an application.
What is HTTPS?
HTTPS is the abbreviation of Hyper Text Transfer Protocol Secure. As the name suggests, HTTPS secure the data transfer between the web client and web server.
The HTTP protocol, which is not secure, makes the data transfer vulnerable, which may cause a lot of potential difficulties for a website and company. In opposite, HTTPS uses secure connection TLS (Transport Layer Security) or SSL (Secure Sockets Layer) to encrypt the data while transferring them between web client and web server and back and forth. This secures the data privacy and authenticates the website’s identity.
The HTTPS security further ensures that users get the right content that they requested, and also allows users to see whether they are on the right website or not. HTTPS safeguards the sensitive data from being stolen or read from the server or during the server-client data transfer.
NOTE: SSL is a deprecated term, and technically it is referred to as TLS.
What Are The Differences Between HTTP and HTTPS?
The security difference: As discussed earlier, HTTP is a stateless communication protocol between a web client and a web server, which is not secure. As a result, HTTP may cause a lot of security threats for the website and make it vulnerable to attacks.
Where HTTP cannot guarantee data security, HTTPS ensures the security of your content while communicating between web client and server. Thus, it eliminates most, if not all, of the security threats for a website and its users.
The encryption difference: HTTP protocol transfers the web client data to the web server or vice versa in a hypertext structured format using port 80 by default.
HTTPS serves data in encrypted format using port 443 and SSL certificate, which significantly improves bidirectional data security.
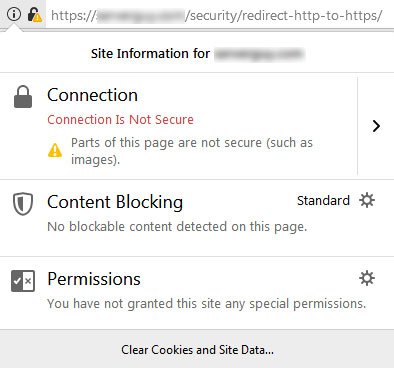
The appearance difference: In the case of HTTP websites, modern browsers show “Connection Is Not Secure” mark on the address bar, which creates trust issues for the users.
When you serve your web content on HTTPS secured network, browsers show the green locked padlock on the browser address bar, which instantly improves the trust factor.
Domain Validation differences: HTTP doesn’t require any sort of domain validation to transfer the data from the web client to the server or the other way around.
HTTPS requires a minimum of domain validation and a few certificates to transfer data securely.
The cost difference: HTTP comes default with the domain and server. This means after you purchase a domain and server, as soon as you make the website live on the internet, by default, it opens with HTTP. So, there is no additional cost involved here in the case of HTTP.
HTTPS is not pre-installed; hence you have to purchase it externally to serve your web content on HTTPS. The cost of HTTPS varies based on the type of HTTPS certificate you need. Generally, there are three types of certificates, namely, DV (Domain Validated), OV (Organization Validated), and EV (Extended Validation). When among these three, DV is the most affordable one, which can cost you nearly 10 to 20 USD per year, the EV certificate is the most expensive one, and you may need to spend 200 to 400 USD per year for an EV certificate.
What Are The Advantages and Disadvantages of HTTPS?
Apart from the data security advantage, which you get right after you migrate your website or blog from HTTP to HTTPS, you can encash two other significant benefits of hosting the site on HTTPS.
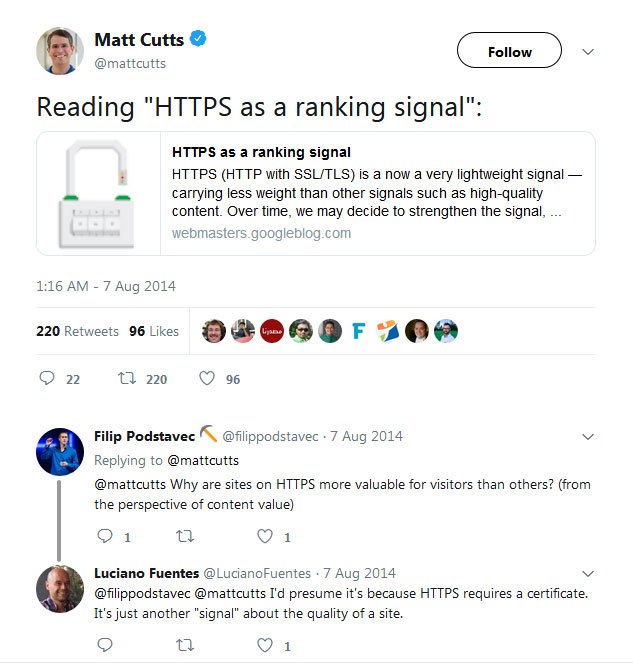
The SEO: Back in 2014, Google introduced HTTPS as a strong search engine ranking signal. According to Google, security is one of the most important parameters that they consider and analyze while ranking contents organically.
Therefore, when Google made HTTPS as an organic ranking signal, more and more sites started migrating their website from HTTP to HTTPS.
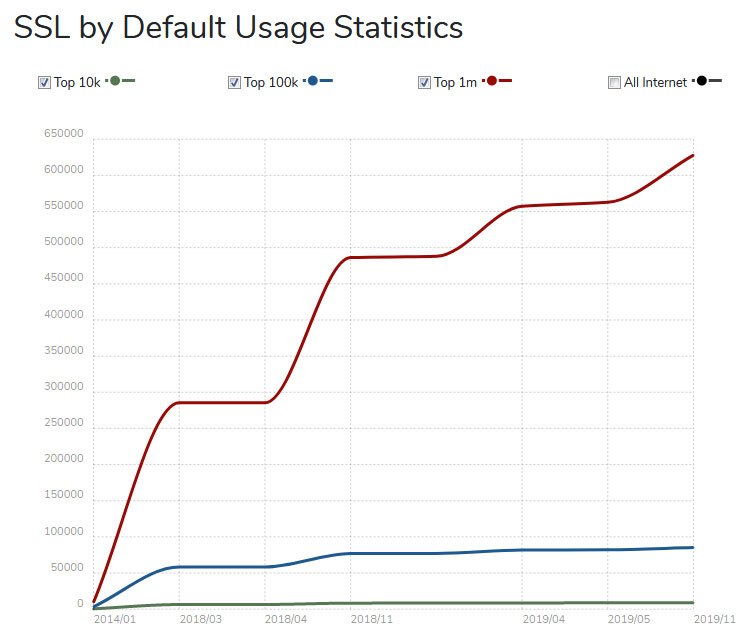
According to a November 2019 report by builtwith.com, where more than 65 percent of the top one million websites are hosted on HTTPS, there 90.18 percent of the top 10K sites serve their contents on HTTPS.
Google uses HTTPS as a positive ranking signal and boosts the ranking of the websites using HTTPS. However, if you fail to follow the HTTPS best practices, you may also experience a major setback in the website’s ranking boost.
The referral data: If your website is hosted on HTTP, and if you get loads of traffic from sites serving contents on HTTPS, you will see most of the referral traffic in the direct traffic section. This may create significant problems for you to analyze the Analytics data to devise your next plan of action.
The trust factor: HTTPS improves the website’s credibility and trust in its customers. Especially if the website uses user data to improve the user experience, or if the site has an online payment system, it must incorporate HTTPS.
Millennials are very particular about data privacy and security. Hence, if your website fails to build that sense of trust and eventually leaves a poor user experience, it will cost you a lot in terms of search engine ranking, organic traffic, and the number of sales conversions.
Serving your web content on HTTPS allows you to show the green padlock on the browser address bar. This enhances the user experience as the user sees that his information is secure on the website, which instantly increases the credibility of the site.
HTTPS disadvantage: Apart from the cost, the only downside of HTTPS is that it is slower than an HTTP website.
HTTPS adds a lot of extra layers to protect and secure data while transferring them between the server and the web client. This increases the network overhead and eventually increases the latency time, which in return slows down the website loading on browsers.
Just like HTTPS, website speed is also an SEO ranking signal. So right after you redirect your website from HTTP to HTTPS, you must optimize the site’s speed and loading as best as possible to make it more effective.
What to Do Before You Migrate Your Website from HTTP to HTTPS?
Finally, if you decide to host your website on HTTPS, you need to be very careful from the beginning until the process is over.
The first thing that you should do is taking the entire backup of the website. This is a fundamental step that you should perform every time before making any significant changes to your site.
Depending on the platform or software you are using for your website, you may have multiple options for taking the backup of the site along with its database. Finally, when you are done with this step, you are ready to move your website from HTTP to HTTPS.
Else, if you can initially prepare a test environment of your website where you will install the HTTPS to see how it goes will be better and advisable. Afterward, you can follow the same steps to migrate your live website from HTTP to HTTPS successfully.
How to Redirect a Website from HTTP to HTTPS?
When you are ready to make the move, you need to do two things primarily.
First, get the SSL certificate: First, check with your host company, if they provide the SSL certificate. If you get it from your host, the entire migration process will be more straightforward, because technically they will support you in each step if you face any difficulties.
In case your host company doesn’t provide you the SSL certificate, you may consider buying it from third-party companies like Comodo (Sectigo), Godaddy, etc. And in that case, you have to generate a Private Key and a Certificate Signing Request (CSR) using your website’s Cpanel.
Second, install the SSL Certificate: Remember, based upon your CSR, the request for the certificate will be created. Now, when you get the SSL certificate, you have to install the certificate using the Cpanel. The entire process is pretty straight and easy.
Right after this, you should load your website on a browser using HTTPS. If you don’t see it coming with HTTPS, or if you see a 4** page, no worries, just clear your browser cache or try opening it using another system that you haven’t recently used to browse your website.
After this, you should see the website is opening with the HTTPS. However, if you see an error, you may ask for help, and your hosting company will assist you with troubleshooting.
What Should You Do Right After You Host Your Website on HTTPS?
Now that you have redirected the website from HTTP to HTTPS successfully, you have to do a few more crucial things to ensure a flawless migration and aftereffect.
It doesn’t really matter what type of website you recently migrated. All you need to remember is unless you complete the next steps, the HTTP-to HTTPS migration isn’t complete.
#1 Redirect the Domain to the HTTPS Version Permanently Using 301 Redirection
At this stage, your website will open on both the HTTP and HTTPS versions, and this a critical issue that has to be corrected right after you migrate the site to HTTPS.
Unless it is done correctly, Google and all major search engines may continue crawling both the versions of the same website, which will create potential problems for it.
To overcome this error, you have to open the WordPress General Settings section. By default, WordPress Address and Site Address URLs should be set to the HTTP version. You have to point both of them to the HTTPS version and save it. This is it for the WordPress website.
However, if you have a non-WordPress site, you have to use the .htaccess or similar tools to set the domain to the HTTPS version.
After it is done, the users, as well as the search bots, will land directly on your site’s HTTPS version.
#2 Activate the HSTS and OCSP
Don’t leave your site after redirecting the domain to the HTTPS. This is not a foolproof solution and still can create a few security problems for the website. Enabling HSTS (HTTP Strict Transfer Security) is a must-do thing right after you redirect the domain permanently to the secure version.
OCSP (Online Certificate Status Protocol) allows CRL (Certificate Revocation List) to be checked only when there is an issue with the SSL certificate. This not only improves accuracy, but it also saves a lot of bandwidth. Additionally, OCSP allows time to collect a new certificate in case the older one expires.
#3 Consider Adding HTTP/2
Adding HTTP/2 can significantly boost the site’s performance as it allows the web client and server to process multiple requests at a time. This reduces the number of requests as well as the latency time, and thus improves the website’s speed and overall performance.
#4 In Case of A WordPress Site, Add HTTPS to the WordPress Admin
Securing the website’s backend is the next thing that you should do. And to do this, you have to have access to the wp-config.php file.
Open the file and add the following code
When it is done, your wp-admin URL should open with HTTPS, and that finally indicates that this step has been properly executed.
#5 Change the Internal URLs to the HTTPS Version
The fifth step is changing the internal URLs of your website to the HTTPS protocol. But this is not only about the internal links, but you have to make sure that all resource links including the internal URLs, JavaScript files/ codes, CSS files/ codes, images, audios, iframe, etc. point to their respective HTTPS version.
Remember, if you mistakenly fail to spot a few resources and continue serving those on HTTP, that will create a problem. Modern browsers will show this as a “Mixed Content” error, which means you have a few contents (resources) served on HTTP when the main page URL is hosted on HTTPS.
If you have a relatively big WP website, you may use WordPress plugins like “Velvet Blues Update URLs“, or use the Find-and-Replace function to point all the resource URLs to the HTTPS. Once done correctly, reload your page, and you should see the green locked padlock appearing right on the browser address bar.
#6 Update Individual Redirection and HTML Tags
As you have redirected your website’s domain to the HTTPS version, from now on, bowser should open all the internal URLs of the site as HTTPS.
However, changing individual redirections to their respective HTTPS versions is advisable, as this will reduce the redirection chains, which in return will decrease the HTTP calls, and eventually speeds up the website.
Not only this but failing to update the individual redirections may create a lot of redirection chains, which will cause a sequence of redirects happening one after one. This has a severe negative effect on the website and may even cause it to lose its ranking signals.
Open the .htaccess, and using the find-and-replace function, point out the redirections and replace the HTTP with HTTPS.
Besides, also consider updating the canonical, hreflang, amphtml tags and point those to their respective HTTPS versions.
#7 Update the Sitemap and Robots FIle
First, download the sitemap file from the server using the Cpanel or an FTP tool. Next, using a find-and-replace function, replace all the instances of “HTTP:” with “HTTPS:”.
Right after you update the sitemap file, open the robots.txt file. If you have a WordPress website, you can access the robots file using the admin section. Else you have to use the Cpanel or an FTP tool to download it to your local system.
Doublecheck the robots file to see if you had earlier blocked any resources that you don’t need to block anymore. Also, update the sitemap URL mentioned on the robots file, and point it to its HTTPS version.
#8 Add the HTTPS Web Property to Google Search Console And Google Analytics Tool
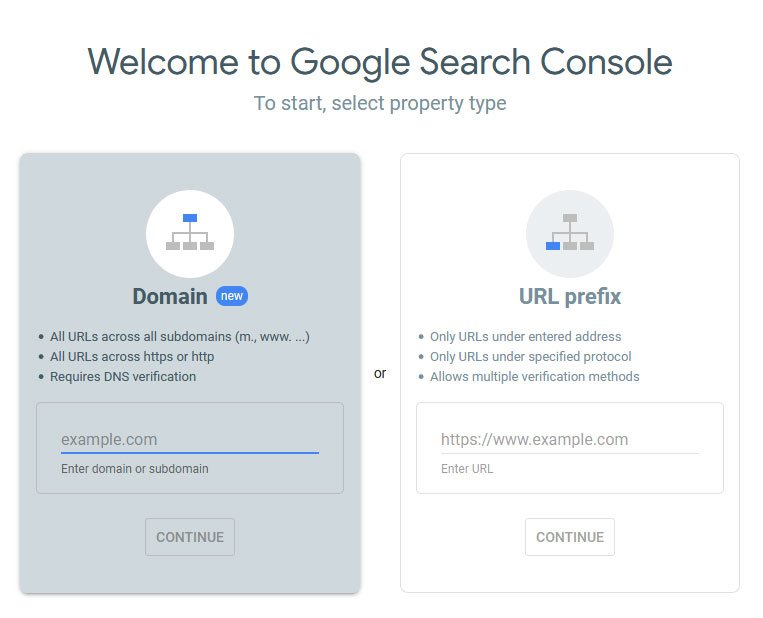
Now that your website is hosted on HTTPS, you should add the HTTPS domain to the Google Search Console tool. This will help Google bots to seamlessly crawl your content served on HTTPS and index them appropriately.
Next, add the updated sitemap file to GSC. Google doesn’t require the sitemap file to understand the internal structure of a website or to crawl and index its contents. However, Google Search Console has an option to add the sitemap file to the tool. Hence, as you have recently updated your sitemap file with the HTTPS version URLs, consider adding that to GSC.
Apart from this, start inspecting most, if not all, of the important internal URLs (HTTPS version) and request indexing them.
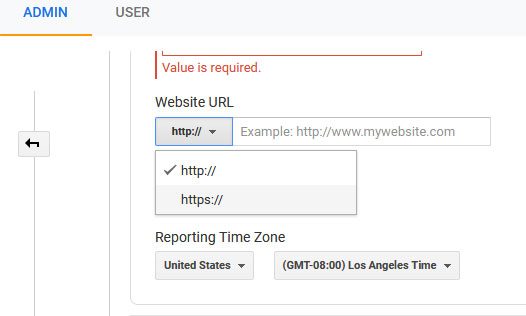
Once you are done with inspecting the URLs on GSC, next update the Google Analytics setting and point the domain to the HTTPS protocol.
Though it’s not going to create a big problem, still, if you have a Google My Business account, you may consider updating it with your site’s HTTPS domain version.
#9 Update the Disavow File
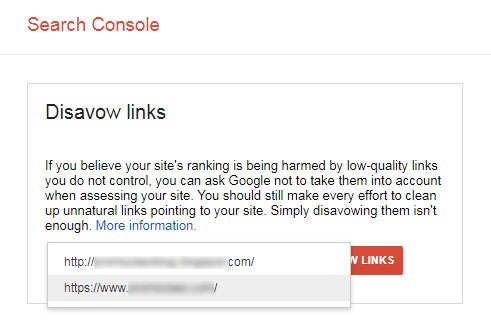
As you have created a new GSC account for the HTTPS property of your website, you should further resubmit the existing disavow file to it.
Disavow file contains all the domains and webpage URLs that have one or multiple links pointing to your site, which are inherently toxic for your website. By listing those domains and URLs on the disavow file and finally submitting that on the GSC tool, allows Google to count them as “nofollow”, which makes the links void and harmless.
So, failing to resubmit this to the Google Search Console tool, may cause a lot of damage to the site’s organic performance, in case a new algorithm update gets rolled out. Hence, update it without delay.
#10 Consider Updating the Inbound URLs and Social Links
First, download the backlink data using a tool, or if you have already kept your inbound link data recorded somewhere, open it. Identify the backlinks that you think are powerful and coming from authoritative websites. Next, check the sites (or pages) if they allow you to update the link pointing to your website.
If you find one way or another to update the backlink, replace the HTTP with HTTPS. This, indeed, not possible for all the inbound links that you have acquired so far, especially if you have a massive volume of backlinks. Still trying it for the best of them is definitely worth a try.
Apart from the backlinks, also consider the social links, which are coming from Facebook, Twitter, Linkedin, Instagram, Pinterest, etc.
Changing these to HTTPS links manually or using tools will reduce the redirection chains, and help you preserve the SEO juice.
#11 Update the Marketing Campaigns and Tools
Finally, the only thing that is remaining is updating the campaigns and tools that you use for marketing, lead generation, sales and conversion rate optimization, data analysis, etc.
Don’t underestimate this step, as if you don’t update the campaigns and tools with the HTTPS versions of your URLs, most of these will collapse and stop working.
#12 Optimize the Website Speed After Hosting it on HTTPS
Hyper text transfer protocol secure sites are relatively slower than similarly optimized HTTP websites.
We know that the website’s loading speed can make or break the user experience of the site, and plays a significant role in improving its organic ranking. Google rewards webpages that load in 3 seconds or less time.
After redirecting your website from HTTP to HTTPs, you should visit the Google Search Console’s Speed (Experimental) section. Double-check the slow URLs. Open the report and go to the “details” section. If you have webpages taking more than 3 seconds to load, GSC will show the “FCP issue: longer than 3s”. FCP (first contentful paint) is the time taken by the browser to render the first visible element of the page right after a user requests it.
If you see a lot of HTTPS URLs taking more than 3 seconds to load, buckle up and start optimizing the speed to load them faster.
A few things that you should do for a website’s speed optimization are
- Incorporate HTTP/2, which can improve an HTTPS site’s speed up to 70 percent.
- Move to a better server with better resources.
- Enable Gzip compression using Cpanel or .htaccess.
- Activate browser caching using plugins like WP Super Cache for WordPress websites, or using .htaccess.
- Optimize image dimensions and remove the image EXIF data. Finally, compress images before using them on your site.
- Minify the JavaScript and CSS codes.
- Consider re-positioning the render-blocking elements.
- Reduce the number of HTTP calls.
- Eliminate the unnecessary redirection chains.
- Use a powerful content delivery network (CDN).
Conclusion
After migrating the website from HTTP to HTTPS, and after implementing all the points mentioned above, you may see a little drop in ranking. However, if it continues for a long time, you should do an in-depth analysis, find out the root causes for the rank fall, troubleshoot the errors, and correct them as quickly as possible.
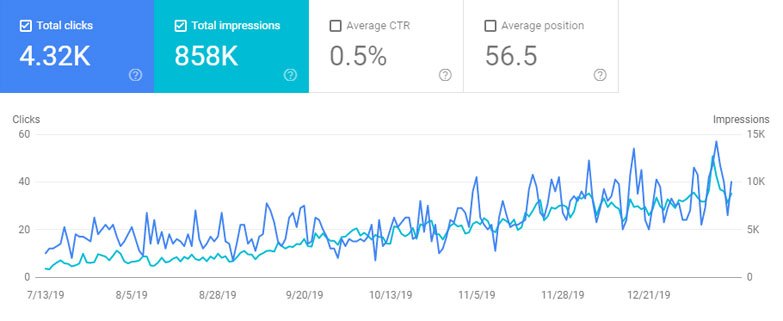
Monitor Google Search Console data closely, especially the coverage and performance data. As, if Google faces any issues while crawling or indexing the content served on the HTTPS protocol, GSC data should indicate that.
Finally, I hope, using this HTTP to HTTPS migration checklist, you will be able to redirect your WordPress website or blog from HTTP to HTTPS easily and quickly. And if you are a beginner who has a minimal budget, you may consider using Letsencrypt.org, which is a free SSL/TLS certificate provider.
Lastly, I would love to know if you have anything to add to this post. Let me know how did you move your site from HTTP to HTTPS? Did you follow any migration checklist? What are the problems you faced during the redirection, and how did you solve the problems?
An advanced All-in-One Digital Marketing Course.
Mentored by Mr. Soumya Roy, the Founder, CEO of PromozSEO Web Marketing Academy.
- Reasons Your Business Needs to be on Instagram - September 16, 2021
- 7 Reasons Your Business Should Invest in Professional Content Creation - August 12, 2021
- 5 Ways You Can Improve Your Website’s Existing Backlinks - April 30, 2021


